Cabinet Painting is a Big Project That Requires Good Surface Preparation

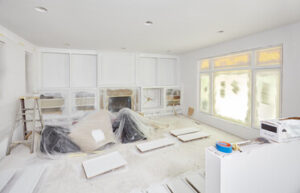
Cabinet Painting Sacramento is a big project that requires good surface preparation for the best quality paint job. This includes removing all doors, drawers and boxes. It also involves sanding the surfaces and cleaning.

Cabinet Painting

Cleaners degrease the cabinets and help to remove grease and natural skin oils that can cause problems with paint adhesion in moisture prone areas like kitchens. Lightly scuff sanding is a great way to improve paint adhesion as well.

If you are going to paint your cabinets, it’s important to understand that it isn’t as simple as just brushing on a coat of your desired color. The process requires prep work, including cleaning, sanding, priming, painting, and curing. It’s not something that most homeowners can successfully take on themselves, and it may be a job better left for the professionals.

The most critical step in cabinet painting is making sure the surfaces are clean. Using a degreaser will remove any oil, grease, and gunk that has built up over time. This will ensure that your new paint adheres to the surface, and will help prevent future chips.

It’s also a good idea to sand the cabinet surfaces down, which will prepare them for the primer and provide a smooth surface for your final coat of paint. This will also remove any flaws or imperfections that might be visible once the cabinet is painted, such as dings or scratches. You can use a hand sander or a power sander, and it’s usually best to sand in the direction of the grain.

When sanding, you should wear a dust mask to protect yourself. Once the sanding is done, you’ll need to apply a thin coat of a high-quality primer. This will seal the surface and create a base for the final coat of paint. There are many different types of primers, and you should consult with a professional at your local hardware store to determine which one is right for you.

Once the primer has dried, you can begin painting. Most pros recommend starting with the doors and working your way to the boxes. This will ensure that the doors are dry before you reattach them, and it will give the boxes a chance to dry before you paint over them.

It’s also a good idea to label each door and box with numbers so that you know which is which when you reinstall them. Using sticky notes is a great way to do this, and you can also make a list on your phone or computer to keep track of which doors go where.

Priming

When painting cabinets, it is important to prime the surface to prevent the original dark color from bleeding through and altering your new light color. This step will also ensure that your new paint job lasts. The best way to achieve a smooth finish is to apply multiple thin coats and let each dry completely before adding another. Sand lightly between each coat to get a beautiful smooth finish.

If you have oil-based paint on your cabinetry, you may need to strip it before repainting. However, if you have latex paint on your cabinets, you can usually skip this step. You should always use a low-VOC paint for health and environmental reasons.

Prior to priming, you should empty your cabinets and relocate any items that can be moved into a different room for safety. Then, remove the cabinet doors and carefully mark them with sticky notes to match them back up when the project is finished. You will need to remove any hardware such as handles or knobs before starting the job. It is a good idea to remove the hinges and screws as well to prevent them from falling or getting lost during the job.

After removing the doors and hardware, you should clean the cabinet surfaces thoroughly with a degreasing product to ensure that all grease and grime is removed. This is important because a cabinet surface that contains grease will not bond with the primer and paint and can lead to a blotchy or patchy appearance. You can use products like liquid deglosser, denatured alcohol or trisodium phosphate (TSP) to clean your cabinetry.

You should also consider using a spackling compound to fill any holes, cracks or dings in the cabinetry before priming and painting. This will make a much cleaner look and will prevent the wood from showing through your final product.

You can choose from a variety of primers depending on your specific needs. Stain-blocking primers are great for hiding nicotine stains or water damage, while adhesion primers create a strong bond that will not peel. If you are sensitive to odors or need a fast drying product, a shellac-based primer might be your best option. You can even find mildew-resistant primers that are ideal for moisture prone areas like kitchens.

Painting

A professional-looking finish is essential when painting cabinets. It takes time and practice to get the job done right, but doing it correctly will result in a beautiful new look for your kitchen.

To achieve a high-quality finish, it’s important to prepare the cabinet surface for paint. This includes cleaning, sanding, and priming. Primer provides a smooth surface for the paint to adhere to, and it also helps to hide imperfections. It is important to use a primer that is specifically made for cabinet painting, and it is best to choose one with a mildew-resistant coating for moisture-prone areas like the kitchen.

Before starting the cabinet painting process, it’s a good idea to remove the hardware from the doors and drawer fronts, as well as the hinges. This will make the job much easier, and it will help prevent the possibility of getting paint on your knobs or handles. It is also a good idea to label the hinges and hardware in Ziploc bags, so that you know what goes where when it’s time to put everything back together.

Once the cabinet boxes are clean, it’s a good idea to wipe them down with a degreaser or TSP solution. This will help to ensure that all of the grease and dirt is removed, so that the new paint will stick. If you don’t clean the boxes thoroughly, the new paint will flake and chip.

It’s also a good idea to lightly sand the surfaces of the cabinet boxes and cabinet doors. This will help to scuff up the existing surface, and it will give the primer and paint something to adhere to. Once you’re done sanding, wipe off any dust with a damp cloth.

If you’re using an oil-based primer, it’s a good idea to wait for the product to dry before beginning the cabinet painting process. This will help to prevent the oil from dripping onto the fresh paint, and it will also make the new coat of paint last longer. Water-based primers usually work just fine, but they aren’t as durable as oil-based products.

Finishing

If you’re a homeowner and want to make a significant change in your kitchen, painting cabinets is an excellent option. It can be a relatively easy DIY project, but there are some things that you should know before getting started.

A quality paint job is the best way to get your new cabinet colors to look their very best. Cabinets are subject to a lot of wear and tear from heat, food stains, splatters, and abrasions, so it’s important that your chosen finish stands up well. A durable, high-impact hybrid water/oil-based cabinet enamel is what many professionals use for their projects.

Before you start, remove the hardware from your cabinets and clean all surfaces to be painted. You’ll need to clean thoroughly in order to remove grease and oil build-up, as these can prevent paint from adhering. You can use liquid de-glosser, a degreaser, or TSP (trisodium phosphate) to achieve this. It’s a good idea to wipe down the cabinet doors as well, as they tend to collect more grime than the boxes.

After cleaning, lightly sand all surfaces to be painted to scuff the old sheen. If you can, opt for an electric sander as this is much faster and more effective than sanding with a hand-held sander. You should also take this opportunity to fill in any dents and holes, as they will show through the finished paint job.

Next, you should sand again to create an even surface for the primer and subsequent coats of paint. If you can, opt for a finer grit sandpaper such as 220-320 grit to achieve a smoother surface. Once you’re done, remove the sanding dust and wipe down all surfaces to prepare them for priming.

Once everything is ready to prime, you can begin painting the cabinet doors. Be sure to use a foam roller for large flat surfaces and a soft-bristled brush to get into corners and tight spots. If you’re sanding between coats, let the previous coat dry overnight before starting the next one.

Once the first coat is dry, you can reattach the cabinet hardware and enjoy your freshly-painted cabinets. Depending on the color you choose, it may take 2 weeks for the paint to cure, so be sure to plan accordingly.

The Basics of Fence Installation

Fences add value to homes and property and improve security, privacy, and functionality. They come in a variety of materials and styles.

It’s best to have professional fence installation, as mistakes or rework can end up costing more in the long run. However, if you decide to DIY, the following tips can make the process easier.

The first step in installing a fence is clearing the area where it will be placed. This will save time and frustration for you and the fence installation crew. If you have any errant rocks, toys, plants, sprinklers or anything else in the path of your fence line, clear them out so the installers can move easily and safely. You may want to consider a fence company that will do this for you as part of their overall service.

It is important to locate where sewage lines, water pipes, and electrical lines run underground in your yard. This is for safety reasons so that the crew doesn’t accidentally hit them when digging holes for the posts. Contact your local utilities or ask your fence company if they have this information. You should also check to see if there are any property easements that need to be considered.

Next, it’s important to dig post holes that are deep enough for stability. A good rule of thumb is to dig a hole that is a minimum of one-third to one-half of the height of the fence post. The type of soil also plays a role in the depth of the hole; sandy soils generally require deeper holes than loamy ones.

Once the posts are set, the rest of the fence can be installed. Be sure to follow the guidelines provided by your fence contractor for sizing and spacing. If you are using panels, make sure that they are properly secured with the screws or brackets provided. If you are using pickets, be sure to stagger them so that the seams will not show.

After the fence is finished, it is a good idea to apply a coat of preservative or stain. This will help to protect the wood from moisture and sun damage. It’s best to let the product dry completely before using the fence.

It’s a good idea to discuss the fence with your neighbors, especially if it’s going on your property line. This will prevent any issues down the road, and it’s a legal requirement in many communities.

Posts

While installing fence posts isn’t a difficult task, it requires careful planning and execution to ensure the stability of your finished product. A good rule of thumb is to bury about one-third of each post’s total length in the ground, and to space them at least six feet apart. Local building codes may require a specific minimum depth, so check with your local authority before starting.

You can use concrete, gravel, or dirt to set your fence posts. If using concrete, be sure to choose a fast-setting mix so that the post doesn’t have to be braced while it sets. If choosing gravel or dirt, be sure to compact it tightly around each post, and use a two-sided post level to make sure the posts are plumb (or perfectly vertical) before adding any additional materials.

To prevent water accumulation and rot, dig each post hole a little larger at the bottom than at the top and add about six inches of gravel to the base. This will help the soil to drain properly, and it will also help prevent the formation of puddles that could damage the posts over time.

Before setting any wood posts, be sure to treat them with a preservative or sealant. This will not only enhance their durability, but it will also help protect them from insects and fungi that would otherwise eat away at the wood. Choose a wood that is naturally resistant to decay, such as cedar or pressure-treated pine, if possible.

When setting the first couple of posts, it’s helpful to use a string and batter board to guide you. This will keep the posts a consistent distance apart and straight, which is critical to creating a well-aligned and sturdy fence.

Once the first two posts are set, dig holes for the remaining posts. Call 811 before digging to learn the location of underground utilities, and then remove any rocks, roots, or other debris that may be in the way of the post holes. Before you start digging, be sure to have your concrete ready; it usually takes four to six hours for it to cure. Once the concrete has cured, you can cover it with soil to give the posts a more natural appearance, or you can opt to leave them bare.

Panels

Choosing the right fence panels is critical to ensuring a safe and durable property boundary. Options range from wood to vinyl, each with their own advantages and disadvantages. Understanding these differences and selecting the best option can help ensure your project is a success.

Premade fence panels are a convenient alternative to constructing a custom fence from scratch. They save time by eliminating the need to mark where posts will go, run plumb lines, dig holes, and set concrete. Nevertheless, they may not be ideal for hilly terrain or unique design requirements that require more flexibility.

Before installing fence panels, make sure the posts are plumb and level with each other by driving a stake at each location then stretching a line across the ground to determine if it’s straight. Once you’ve determined the proper height of your fence, measure and mark the locations of the corners of each panel. Start with the corner posts and work outward from there, building one panel at a time. It’s important to use blocking underneath each panel when setting it to prevent it from sagging or bowing over time.

Using wood fence panels requires regular maintenance to protect it from weathering, rot, and pest infestation. Staining or painting can be helpful to preserve the wood’s aesthetic and structural integrity. However, these methods are not foolproof and may require regular reapplications.

Another consideration is the impact of fence panels on a home’s value. The style and condition of a fence has a significant influence on its perceived value. Researching which fence styles are most appealing to potential buyers and how they can enhance the curb appeal of a home is essential for achieving a positive first impression and increased property valuations.

Wood fence panels offer numerous design and customization options to match a homeowner’s aesthetic preferences and property specifications. However, these choices often add to the overall cost of the project. Consideration of alternative materials, such as aluminum or vinyl, can significantly reduce installation costs while ensuring a safe and secure yard.

Sustainable fencing solutions also involve assessing the materials used in fence panels and their environmental footprint. This involves evaluating whether they are recycled or sourced from renewable resources, and examining the manufacturing process to ensure it uses energy efficiently and minimises waste.

Final Touches

After the posts have been set, it’s time to install the rails and panels. This is when your fence really starts to take shape and can be seen from the street or garden. Again, precise measurements are key to ensuring the final product is consistent and aesthetically pleasing. This is also the point when your fencing contractor will likely apply any necessary finishing touches, such as gate installations or the addition of hardware and decorative features.

After preparing the area—removing any rocks, plants, or debris that could hinder installation—the fence line is marked with stakes or spray paint. The fence installer will also call 811 to mark any underground utilities like sprinkler lines or electrical cables (if applicable). This step is important, as it ensures that any digging work does not disturb these vital services.

Once the post locations have been mapped out, stakes are driven into the ground where the posts will be located, usually 6-feet to 8-feet apart. These marks will be used to guide the construction of your fence. When all the posts are in place, they will be leveled and aligned to the fence line using a post level. After they’re properly set, concrete is poured into the holes to secure them. This is a critical process, as the stability of your fence relies on these being set properly.

Depending on your choice of fence material, your contractors may use screws or nails to secure the panels to the posts. Some types of fences require special fasteners, while others can be installed with the help of a tool called a Fence Stretcher, which distributes tension evenly along the entire length of the fence. Once the panels are in place, your fencing contractors will attach a wire to each post, using fence staples or ties designed for your specific type of post. This will help hold the wire in place and prevent it from sagging or falling off the posts over time.

While it’s easy to get intimidated by the idea of installing a fence, partnering with a reputable contractor can make the process straightforward and efficient. Be sure to do your homework before selecting a contractor, reading reviews, comparing quotes, and checking licensing and insurance coverage. With proper care and attention to detail, your new fence will add both functionality and value to your property.